Transitioning your organization to a new data management system is, like buying a new house, both exciting and intimidating. You get a better kitchen and new furniture, but first you have to pack up your entire mess and move a huge pile of boxes across town. On a timeline. With three kids and a dog, in the middle of summer. We know how overwhelming it can be, so at Cloud for Good we like to start with a conversation: Tell me about your current processes. What are you doing now? What information do you collect, and when? Who puts it into your spreadsheet/database/CRM?
And then we ask the same questions again, but instead of asking how things are, we ask how you’d like them to be. Before we ever get into the nitty-gritty details of objects and fields, before we ever ask who will be using this data and for what purposes, we ask about process. When your organization has a well-defined business process, you get cleaner and more consistent data, clearer job roles, and greater accountability. In other words, everyone knows who is doing what and when, and how to do their part effectively.
For nonprofits, however, living out even the best-defined business processes on a day-to-day basis can be a challenge. Sales organizations often have highly specialized employees who run through the same one or two processes over and over again, forty hours a week, for years on end. Nonprofits, in contrast, often function with a small number of employees with wide-reaching roles and a large number of volunteers who may come once a week or a few times a year. So what are your options?
- You could decide that maintaining your CRM just became your new full-time job (on top of everything else, of course).
- You could take inspiration from the myth of Sisyphus and spend your life training volunteers, and retraining them, and training more of them…
- You could give up on the lofty ideal of business processes and try to function with a haphazard collection of messy data.
- Or, if none of those options sound terribly appealing, you could use a visual flow.
But what is a visual flow? Isn’t that just a workflow rule? Aren’t those hard to create? All good questions. Let me start off by reassuring you that flows are different, but they’re not all that difficult. They weren’t developed by Salesforce in the first place, so the biggest barrier to entry is having to learn their unique logic. But we’ll get to that in a minute. Before we go any farther, I want to make clear that a visual flow is not just an amped up workflow rule. Where workflow rules allow you to define criteria that automatically trigger certain activities in the system (like field updates and emails), visual flows structure a collaboration between you and Salesforce. They were created to be interactive and perform best in situations where both the user and the system have something to contribute.
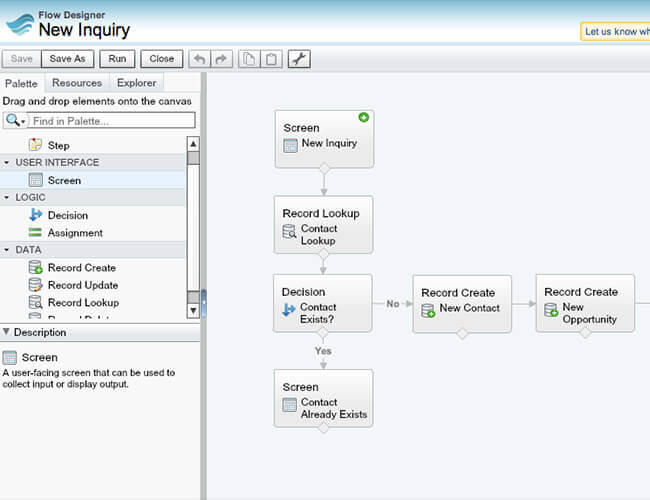
That’s nice, but how about an example? Say you have a stack of interest forms from a local volunteer fair, and for each one, you have to search and confirm they aren’t already in your system, create a new Contact, add at least one Opportunity, create a follow-up task, and make sure they’re all correctly associated with the event’s Campaign. But if you’ve created a visual flow, you (or one of your wonderful volunteers) can just navigate to a custom tab or a URL you’ve bookmarked – or even just click a button on the Campaign record – instead. Just fill out one form, in one place, then the visual flow will use the information you’ve entered to create a contact, one or more opportunities, and the follow-up task for you. Your volunteers never have to learn your business process in the first place (much less remember it!), because the visual flow will enforce the process for you, keeping your data organized and consistent. Easy for your volunteers and good for your organization!
Okay, I’m on board. Now what? Now we spend a few minutes working through the underlying logic of visuals flows. Like I said earlier, because they are a Salesforce purchase, they work a little differently than the rest of the system. To get to the Flow Designer, navigate to Setup / Create / Workflow & Approvals / Flows. When you’re in the Designer, you’ll notice three tabs: Palette lists all the action elements for a flow, Resources lists all the data elements, and Explorer shows you the parts you’ve already created. Before you start building, take a few minutes to think through your process and what data will be involved. A “variable”, for example, is any piece of information that may vary each time you run the flow, and you’ll need to create one for any data the flow needs to “remember,” including parameters passed through the URL or information typed in by the user.
The heart of a visual flow are the action elements:
- Step Element: acts as a placeholder when you’re planning your flow and don’t yet know which element you’ll need
- Screen Element: allows you display to and/or request information from the user
- Record Lookup Element: uses data put into the flow to look up an existing record and store values from its fields for later use
- Record Create Element: creates a new record with the fields you’ve specified using values from the flow
- Record Update Element: updates fields on one or more existing records based on values from the flow
- Record Delete Element: deletes one or more existing records
- Assignment Element: allows you to change the value of a variable, especially handy when dealing with dates in flows
- Decision Element: evaluates a set of criteria to determine which outcome to act upon
- Subflow Element: allows you to trigger another flow and pass data into it
- Apex Plug-in Element: allows you to call an Apex class to pass data between your organization and the flow
Flows are built by dragging these action elements onto the canvas, then setting the parameters for each action. To connect them, and indicate the order of the elements within the flow, just click on the diamond at the bottom of one element and drag your mouse across to the next one. A green line will appear. All that’s left is to identify the starting element by clicking the green icon on the top right of the action and to activate the flow.
That doesn’t sound all that hard, does it? You’ll probably have to play around a bit to get the hang of things, but it’s worth it. You’ll end up with less training and cleaner data, and that means less stress and more productivity. There’s definitely nothing wrong with that!