I don’t know about you, but I love streamlining user experiences. A simple, streamlined process can improve data quality and reduce user frustration. As we discussed here, Visual Flows are a powerful tool for streamlining and simplifying data entry. After you build and implement a flow, you only have to enter the data once– and the flow powers the rest of your business process. But, what if the data already exists somewhere in your Salesforce database? How can a Flow leverage the data that you already have to create or update other records? With a little bit of Visualforce, you can extend your flow into an even better tool for managing and maintaining your data.
Let’s say I have a contact record, and I need to create three Orders (a custom object) for items to mail to my contact over the next several months. Normally, the mailing address for the order should be the same as the contact’s address, but sometimes I need to use a different address instead. A flow will help me create three orders at once with the correct mailing address and shipping dates, and link each order back to the contact. Here’s how.
Building your Flow
When you design your flow, think about the data that you want to feed into it from an existing record and how much flexibility you need. Will you ever need to edit the data coming into your flow? In my case, I want the primary address from my contact to be the default value for creating my three orders– but I want the ability to change that for the exceptions where it needs to ship to a different address. On the other hand, I want the flow to always link the orders created to the contact I started with. I don’t need an option to change that data within the Flow.
For each piece of data, you’ll need to create a variable in your flow– be sure to set the variable’s Input/Output type to “Input only” or “Input/Output” so that it can receive values from outside of the flow! Each variable needs a unique name. I’ve found it helps to name the variable starting with the object that will be the source of the data, just to keep track of where it’s coming from. In this case, I’ll create one variable named var_Contact_Street for the street address, and another variable named var_Contact_Id for the contact lookup. For the purposes of this example, I’m only going to use these two variables– but you can create as many as you need to capture your data.
Now that I’ve created my variables, it’s time to put them to work. In my Flow, I’ll create a display screen. On that screen, I will create a text input field called “Street Address”. If I stopped here, the user of the Flow would have to type in the address that already exists on the Contact record. This is where the variable comes in! I’ll set the default value on the Street Address field to the variable, var_Contact_Street. Now, the contact’s address will be displayed in the input field– but I have the option to change it if necessary. I’ll add one more field to this display screen– a date selector to capture when the first order should ship. We’ll call this “Ship_Date_1”.
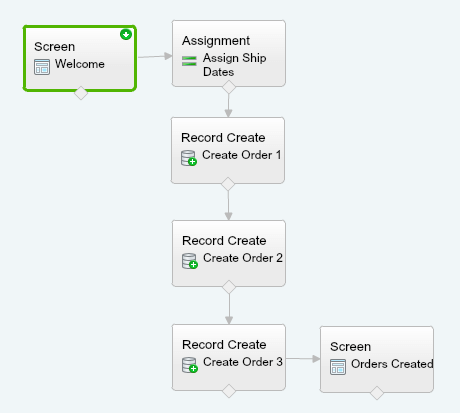
Before I start creating the new records, I need to assign the ship dates for the second and third orders. The second order should ship 30 days after the first one, and the third should ship another 30 days after that. I’ll create two new variables: “Ship_Date_2” and “Ship_Date_3”, and for each of them I’ll set the default value to “Ship_Date_1”. Then I’ll use the Assignment element within the flow, to add on the extra days. For “Ship_Date_2”, I’ll set the Operator within the Assignment element to “Add”, and the value to 30. For “Ship_Date_3”, I’ll do the same, but I’ll add 60. This will update the variables to store dates 30 and 60 days after Ship_Date_1.
Next, it’s time to create my Order records. I will use the “Record Create” element of the flow, and set the object to Order. When I assign values for the Order to be created, I will set the Contact lookup field to var_Contact_Id. Even though this value is never displayed to the user, it operates in the background. For the Street Address, I will select the value of the Street Address screen input field. Do not use a variables for record creation if you use it as the default value for a screen input field. Use the screen input field value instead– it will carry the default value from your variable if the user didn’t change it, or the updated value if the user did change it. I’ll set the ShipDate for this record to use the variable Ship_Date_1.
Now, I’ve created one order. I can just copy that element and paste it back into my flow two more times, and just update the ShipDate to Ship_Date_2 on the second and Ship_Date_3 on the third. Now, my flow will allow me to create three new Orders, spaced 30 days apart, with one click– think about what this could do for efficiency in your own organization!
Getting Data into the Flow
Now that we’ve looked at how to work with the input variables inside the flow, let’s look at how to get your data into them. This is where a bit of Visualforce comes in. You’ll need to create a new Visualforce page. Go to Setup > Develop > Pages, and click “New”. A basic page with some default content will appear. You can delete the default content– just keep the <apex:page> and </apex:page> tags.
You’ll also need to set the standard controller– that’s telling the page what object you’re starting from. In this case, since I’m pulling data from a Contact record, I want to use the Contact standard controller. So, I’ll edit my <apex:page> tag as follows:
<apex:page standardController=”Contact”>
If you want to pull data starting from a different object, such as an Opportunity or an Account, you would enter that instead of “Contact” when declaring the standard controller for the page.
Now, you just need a couple more lines of code. The first thing you need is a tag for the flow: <flow: interview name=”FlowName”> (replace FlowName with the name of your Flow). You’ll also need the closing tag: </flow:interview>. These couple of lines of code tell your page to launch the flow. Now, we just need to get the data into it.
To get data into our Flow using Visualforce, we’ll use the <apex:param> tag. For each variable, you will declare the variable’s name in the flow, and its value from the object, using the following syntax:
<apex:param name=”var_Contact_Id” value=”{!contact.Id}”/>
The name is always the flow variable, and the value is always the API name for the data from the record.
So, your finished page should look something like this. I’ve bolded the values that might be different for you.
<apex:page standardController=”Contact“>
<flow:interview name=”OrderFlow“>
<apex:param name=”var_Contact_Id” value=”{!contact.Id}“/>
<apex:param name=”var_Contact_Street” value=”{!contact.MailingStreet}“/>
</flow:interview>
</apex:page>
Now, your page is ready to go. Click Save and move on to the next step!
Put a button on it
Now that we have our flow and our page ready, let’s put it all together with a custom button. Create a custom button on Contacts (or whatever object you’re working with), and set the content source to “Visualforce Page”. Select the page you just created from the “Content” menu and click “Save.” Place your new button on a page layout, and you’re ready to go!
Now you know how to use Flows and a bit of Visualforce to leverage the data that you’re already managing in Salesforce. Stay tuned for my next blog, where I’ll explore a few more advanced applications of Flows!


